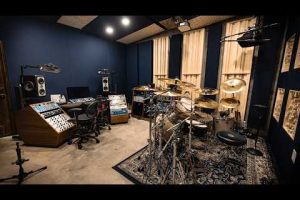
Building a sound studio is one of the most rewarding investments you can make as a musician, podcaster, voice-over artist, or content creator. Whether you are setting up a home recording studio from scratch or upgrading an existing space, the process requires careful planning, smart equipment choices, and a solid understanding of room acoustics. This comprehensive guide walks you through every critical stage, from selecting the perfect room to choosing the right gear and treating your space for professional-grade audio.
Over the years, home studios have evolved dramatically. What once required a dedicated commercial space and a six-figure budget can now be achieved in a spare bedroom or garage. The key is knowing where to allocate your resources and which decisions will have the biggest impact on your final recordings. Below, we break down the entire journey of creating a professional recording environment that delivers clean, accurate, and broadcast-ready sound.
Understanding What Goes Into Building a Sound Studio
Before you purchase a single piece of equipment, you need a clear picture of what your studio needs to accomplish. A studio built for recording a full band will look very different from one designed for voiceover work or podcast production. Understanding your primary use case shapes every subsequent decision.
Defining Your Studio Purpose
Ask yourself what you plan to record most often. Are you tracking vocals and acoustic instruments, producing electronic music, or recording dialogue for video projects? Each discipline places different demands on your room, gear, and monitoring setup. For instance, a music production studio benefits from a wider frequency response and multiple monitor positions, while a voiceover studio prioritizes a dead, reflection-free environment. Write down your goals, expected workflow, and the types of projects you will tackle most frequently. This clarity prevents wasted spending and ensures your studio serves your creative process rather than the other way around.
Choosing the Right Room and Space
The room you select is arguably the single most important factor in your studio build. No amount of expensive equipment can fully compensate for a poorly chosen space. When evaluating potential rooms, consider several key physical properties that directly affect how sound behaves inside the enclosure.
Room Size, Shape, and Acoustic Behavior
Larger rooms generally offer more low-frequency accuracy and less bass buildup, but they also cost more to treat and require more acoustic panels. Smaller rooms can work excellently if properly treated, though they tend to emphasize mid and high frequencies while struggling with bass resonances. Avoid perfectly square rooms whenever possible because parallel walls create standing waves and flutter echoes that are notoriously difficult to eliminate. Rectangular rooms with uneven dimensions tend to distribute sound more evenly.

Other factors to evaluate include ceiling height, window placement, and the construction material of the walls. Rooms with concrete or brick interiors tend to be naturally more reflective, while drywall and wood frame rooms may need additional mass for sound isolation. Consider the ambient noise level in your neighborhood, the proximity to traffic, and any mechanical systems like HVAC units that introduce unwanted background sound.

Acoustic Treatment and Soundproofing Essentials
Many beginners confuse soundproofing with acoustic treatment, but these are fundamentally different processes. Understanding the distinction is critical for building a sound studio that performs at a professional level.
Soundproofing vs. Acoustic Treatment
Soundproofing prevents sound from entering or leaving your room. It blocks external noise such as traffic, neighbors, and household sounds, and it keeps your recordings from bleeding into adjacent spaces. Soundproofing typically involves adding mass, sealing gaps, decoupling walls, and using dense barriers.
Acoustic treatment, on the other hand, controls how sound behaves inside the room. It manages reflections, reduces room modes, and creates a balanced listening environment. Treatment includes absorption panels, bass traps, diffusers, and broadband absorbers placed at strategic reflection points.
| Aspect | Soundproofing | Acoustic Treatment |
| Primary Goal | Block external noise and prevent sound leakage | Control internal reflections and frequency balance |
| Key Materials | Mass-loaded vinyl, resilient channels, green glue, sealed doors | Fiberglass panels, rockwool, foam diffusers, bass traps |
| Cost Range | Moderate to high depending on wall construction | Low to moderate for basic setups |
| When to Apply | During construction or major renovation | After soundproofing is complete |
For most home studio builders, a combination of both approaches yields the best results. Start by sealing every gap around doors and windows, then add mass where needed. After soundproofing is addressed, focus on broadband absorption at first reflection points, bass traps in corners, and diffusion on the rear wall to create a natural sense of space.
Core Equipment for a Professional Sound Studio
Once your room is ready, selecting the right equipment becomes the next major milestone. You do not need top-tier gear on day one, but investing in quality essentials ensures your recordings capture detail accurately and translate well across playback systems.
- Audio Interface — This is the central hub that converts analog signals to digital and vice versa. Look for models with high-quality preamps, low latency, and sufficient input/output options for your needs. Popular choices range from entry-level units like the Focusrite Scarlett series to professional interfaces from Universal Audio and RME.
- Studio Monitors — Accurate speakers are non-negotiable. Nearfield monitors such as the Yamaha HS series or Adam Audio T7V provide a flat frequency response that lets you hear your recordings truthfully. Pair them with monitor stands to reduce floor reflections.
- Microphones — A large-diaphragm condenser microphone excels at vocals, while dynamic microphones like the Shure SM7B handle loud sources and untreated rooms with grace. Having both options gives you flexibility across different recording scenarios.
- Studio Headphones — Closed-back headphones like the Audio-Technica ATH-M50x or Beyerdynamic DT 770 Pro are essential for tracking without bleed, while open-back models such as the Sennheiser HD 600 are ideal for mixing and critical listening.
- DAW Software — Your digital audio workstation is where all recording, editing, mixing, and mastering take place. Industry-standard options include Pro Tools, Logic Pro, Ableton Live, and Reaper, each offering distinct workflows and feature sets.
- Cables, Stands, and Accessories — Do not underestimate the importance of quality XLR cables, microphone stands, pop filters, shock mounts, and a reliable audio interface connection. These small details reduce noise and signal degradation throughout your signal chain.
Step-by-Step Process to Build Your Sound Studio
Now that you understand the core components, here is a practical roadmap for assembling your studio in a logical, efficient sequence.
Beginner Setup

If you are starting from a blank room with a limited budget, focus on the essentials first. Choose a rectangular room with minimal windows, seal any air gaps, and install basic acoustic panels at the first reflection points on your side walls. Invest in a reliable audio interface, one quality large-diaphragm condenser microphone, a pair of nearfield monitors, closed-back headphones, and a DAW that fits your workflow. Spend your remaining budget on a decent microphone stand, a pop filter, and a few feet of high-quality cable. This foundation gives you a clean, usable recording environment that can grow with your skills.
Intermediate to Advanced Configuration
As your studio matures, expand your microphone collection, add a second pair of monitors for an expanded stereo image, and invest in outboard gear such as a hardware compressor or EQ for color and character in your signal chain. Upgrade your acoustic treatment with dedicated bass traps, broadband absorbers, and diffusers. Consider building or purchasing a portable vocal booth if you frequently record spoken content. Advanced users may also integrate MIDI controllers, additional preamps, and a dedicated monitoring system calibrated to the room using measurement microphones and software like Sonarworks.
The best studios evolve over time. Start with a solid foundation, learn your room and your tools deeply, and upgrade strategically based on real workflow needs rather than impulse purchases.
Frequently Asked Questions
What is the minimum budget needed to build a basic home sound studio? A functional beginner studio can be assembled for between $500 and $1,500, depending on whether you already own a computer. This budget typically covers an entry-level audio interface, one microphone, a pair of budget monitors, headphones, a DAW, and basic acoustic treatment panels. Keep in mind that the room itself and the quality of your acoustic treatment often matter more than the price of your microphone.
Do I need a completely soundproof room for professional recordings? Not necessarily. While soundproofing helps reduce external noise, many professional home studios focus primarily on acoustic treatment rather than full isolation. The goal is to create a controlled listening environment where reflections are managed and your recordings are clean enough for mixing and mastering. Full soundproofing with decoupled walls and floating floors is ideal but often impractical and expensive for home setups.
What is the best room shape for a recording studio? Rectangular rooms with non-parallel walls are generally considered the best choice. Irregular wall angles help distribute sound waves more evenly and reduce standing waves. Avoid square rooms and rooms with large parallel glass surfaces. If your room is square, angled acoustic panels and strategic placement of bass traps can mitigate many of the associated acoustic issues.
How many acoustic panels do I actually need? There is no single number that fits every room, but a common starting point is four to six panels at primary reflection points, two bass traps in each corner, and additional absorption on the rear wall behind the listening position. The exact quantity depends on your room size, materials, and intended use. Conducting a room measurement with analysis software can give you precise data on where treatment is most needed.
Can I build a professional studio in a closet or very small space? Yes, many professional voiceover artists and podcasters record in small spaces. The key is to maximize acoustic treatment in that compact area, use a dynamic microphone that is less sensitive to room reflections, and apply proper mic technique to minimize pickup of unwanted ambient sound. Small rooms can produce excellent results when treated thoughtfully and used with the right recording approach.
Is it better to build a studio from scratch or convert an existing room? Converting an existing room is usually more practical and cost-effective for most builders. A spare bedroom, basement, or garage already has walls, a ceiling, and a floor that you can treat and modify. Building from scratch gives you complete control over room dimensions and construction, but it requires more time, permits, and budget. For the vast majority of home studio builders, conversion is the smarter path to a professional result.
Building a sound studio is a journey that rewards patience, research, and thoughtful decision-making at every stage. By selecting the right room, treating your space properly, investing in core equipment, and following a structured setup process, you can create a recording environment that rivals professional facilities. Start with your priorities, build incrementally, and trust your ears as the ultimate guide to every upgrade and adjustment you make along the way.